2.06 How to set properties and add validations
What is a property?
The core purpose of the bot is to collect information from the user and keep track of user preferences and requirements. The pieces of information like Phone Numbers. Email IDs , date of Birth and many more, that are shared by the user, are stored on the platform for further use in the form of Properties that make up user's profile.
How to create a new property?
You can create a property in the Chat Flow > Property tab by clicking on the 'Create Property' button.
You can also create a property in the Chat Flow > Conversations tab simply by typing two curly brackets followed by the name of the property in the Set property block or in any of the text messages.
Click on the 'Add' button highlighted above to create a new property named 'First'. A property can be a text, date, number, decimal, phone number, boolean(true/false) , location or an object (image).
A property can be of two types :
- Customer Property
A customer property can be used to save attributes related to a particular user. All these properties can be viewed in the user' profile in the Audience tab. Values for these properties will remain saved until and unless specially changed. - Session Property
Similar to the session variables used in coding languages, these are session level properties and cease to exist once a session of interaction is completed.
How to store a value for a property?
You can store properties in the Chat Flow > Conversations tab. There are multiple ways of storing properties on the platform:
- 'Set Property' block
You can set up value for a property manually using the 'Set Property' block. Select the name of the property and add the desired value.
'Set property' block is also present in the 'Conversation' type buttons and QRs (Covered in Chapter 2.3 How to use buttons and Quick Responses ). You can set a value for a property in these buttons and QRs and whenever a user clicks on any of these, the property will be set along with jump to another conversation.
This block can also be used to clear the value of property. Set the value for any property as 'UNSET' to clear the property as shown in the below image.
- Store user response in a property
You can save users responses in a property by using the toggle switch 'Store user response in property?' as indicated by (1) block in the below image.
Once the toggle switch is turned on, you can add a validation for the user message as indicated by (2) block in the below image. These validations can be of multiple types, here we have chosen 'Free text' and added the list of values that prevents the user from providing a response other than the list. We will talk about validations in detail later in this chapter.
Once you have added the required validation, you can now choose the property name where you want to save users response as indicated in the block (3) in the below image. In case the required property is not existing , you can create a new property in this block, by clicking the 'Add' button.
User can either click on any of the Quick responses provided or he can type the name of the city manually and the response will be stored in the property
The platform provides an option, where you can also prevent the user from typing the response for any particular question from the keyboard and only choose one of the QRs provided. You can do this using the 'Allow user to type anything' toggle switch s shown in the below image. It is switched on by default.
You can turn the switch off, hence preventing the user from using the keyboard to provide a response. If you turn this switch off, and the user types anything, the sends a default error message asking the user to choose one of the options provided in the form of QRs.
How to add user message validations?
You can choose the validation type while storing users response in a property as shown in the above image. The platform provides the following validation types:
- Free text - It allows the user to provide any kind response. For adding validation for free text , you can add the list of allowed free text responses.
If the user types any thing other than the list, the bot will provide an error message along with the complete list, making it easier for the user to make a choice. - Number - Allows only number responses
- Email - This validation checks the format of the email and allows only valid domain names.
- Date - Allows all formats for date
- Url - Allows all valid URLs
- Phone number - Allows only valid phone numbers
- Image - Allows all image types
- Video - Allows all video files
- Audio - Allows all audio files
- Other Files - Allows all files other than image video and audio
- All Files - Allows all kinds of files
- Location
Why do we need user message validations?
User message validations are very important not only for preventing the bot from collecting junk data, but also to make the bot more intelligent and user friendly.
Every time a the user's response fails the validations, the bot tries to map the response with the trigger rule added in conversion modules and FAQs integrated in the bot. If there is no validation, the user's message will be saved in the property and the normal bot flow will continue without answering user's question.
Now lets take an example of a lead generation use case for home loans, the bot is asking the user to provide the name of his city, the validation type is Free text and we have not added any list. Instead of providing the name of the city, the user is keen on asking 'What are the charges for prepaying the home loan?'.
As we have added no validations, and allowed the user to add any free text, his response will be saved in the property and the bot will continue with the further flow , without satisfying the user's query. Hence creating a bad experience for the user along with adding a junk data value in the CRM.
By adding the list of cities as the validation criteria, if the user asks any question, the validation would fail and the bot would try to match user's response with the FAQ already added in the bot. If there is a match, the bot would first answer his query and then continue with the same question again. Hence providing an amazing experience to the end users.
In cases where the user's response does not match with any of the starting rules for conversation modules or any of the FAQs integrated in the bot, the bot will provide an error message to the user, asking him to choose/type correct response.
How to skip questions in conversation modules?
How to skip questions in conversation modules?
In certain scenarios, there might be a need for the bot to skip some questions to maintain the bot flow and prevent the user from getting irritated.
- Allow user to skip message in case of error
You can provide a user an option to skip any question on error by switching on the 'Allow your to skip message in case of error' toggle switch as indicated by the arrow in the below image
If you switch on this toggle, the bot will provide the user an option to skip this question along with the the other quick responses as indicated in the below example:
As the user provided a response with an incorrect phone number, the bot sends a default error message along with an option to skip the question. - Validation error threshold
The platform has a functionality to set up a threshold value for the validation errors. If the error is repeated many times to reach the threshold value, the bot automatically skips the question. You can also set the threshold value for the validation error by clicking on 'Advanced Settings' option as shown in the below image.
You can change the value of threshold in the Error threshold block. If the threshold value is reached the bot sends the below default message with the user and automatically skips the question.
Default error message: 'You have entered wrong value too many times, skipping question'.
You can also customise this default message. We will talk about it later in this chapter.
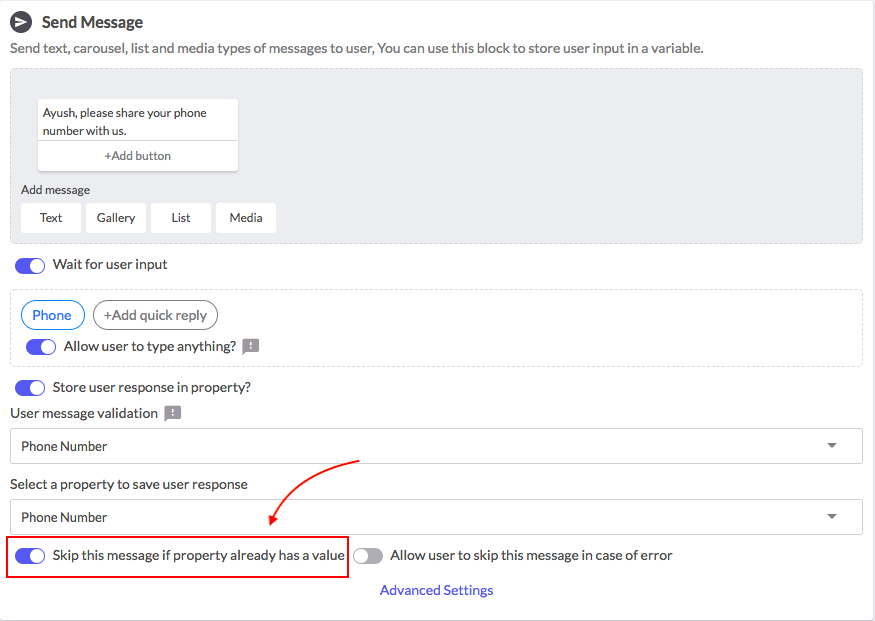
- Skip Question if property already has a value
The platform provides you a option to set a rule for a question block to be skipped, if the property to be saved, already has a value.
You can simply switch on the 'Skip message if property already has a value' toggle.
You can simply switch on the 'Skip message if property already has a value' toggle.
How to customise default error messages?
- Validation error default message
Whenever validation for any particular question fails, and there are no matching conversations for the user's response, the bot sends a default error message to the user asking him to provide a correct response. These default error messages can be different for each type of validation. Default error messages are as below: - For Error Threshold Reached : You have entered wrong value too many times, skipping question.
- For Invalid Text Response : Invalid input. Please try again.
- For Invalid Number Response : Enter a proper number
- For Invalid Phone Number Response : Please enter a valid phone number
- For Invalid Email Response : Invalid email id! Please enter your email address again.
- For Invalid URL Response : Please enter a valid URL
- For Invalid Date Response : Please enter a date
- For Invalid Location Response : Please give a proper location.
- For Invalid Text Response With Options : '{{content}}' does not look right!.\nPlease respond with one of the following: (comma separated options)
The platform provides you an option to customise the this default message. You can simply click on the small exclamation mark button as indicated by the arrow in the image below. - Validation error threshold - Default Message
When the threshold value is reached, the bot sends the below default message to the users and automatically skips the question.
Default error message: 'You have entered wrong value too many times, skipping question'.
You can also customise this default message in the 'Advanced Settings' by clicking on the small exclamation mark button as indicated by the arrow in the image below. - Not allowing your to type anything - Default Message
As discussed earlier in the chapter, we can prevent the user from typing anything and only choose one of the quick responses provided.
If the user tries to type a response, the bot sends the below error message by default.
'Please select the reply from below mentioned quick replies only'
You can customise this error message by clicking on the small exclamation mark button as indicated by the arrow in the image below.
Hope this helps you to create a user friendly bot!
Related Articles
[Configure: Chat Flow] Properties
What is a property? The core purpose of the bot is to collect information from the user and keep track of user preferences and requirements. The pieces of information like Phone Numbers. Email IDs , date of Birth and many more, that are shared by the ...[Configure: Chat Flow: Conversations] Set Property
What is a property? The core purpose of the bot is to collect information from the user and keep track of user preferences and requirements. The pieces of information like Phone Numbers. Email IDs , date of Birth and many more, that are shared by the ...3.05 How to set up conditional follow-ups
What are Workflows? Morph.ai platform provides a uniques feature name 'Workflows' that are intelligently timed follow up messages that can be used to boost the customers interest in the brand offerings. Workflow are automated conditional follow-up ...2.04 How to set up branch conversations
Branching in conversations helps you to send the users down different paths based on certain condition. To add a branch conversation you can simply hover over the top of each conversation module or at the left bottom corner of each block and click on ...[Configure: Chat Flow: Conversations] Send Message
How to create a message? A message can be created in the Chat Flow > Conversations tab You can get started by clicking on the ‘Send Message’ block. You can choose the Facebook/WhatsApp message block based on the type of bot you are creating. The ...