4.02 How to deploy your bot
The deployment process is made simple my the Morph.ai platform. It is divided into two sections, Source and Channel.
Channel
Channel tab lets you choose the channel through which you want to reach out to the users. You can either interact with your users on Facebook through your Facebook page or you can deploy the Facebook Messenger bot widget on your website.
In case, most of your audience is not on Facebook then you can use Livechat widget on your website, to interact with your users.
Morph.ai also provides a unique widget option for a Hybrid Chat.It is a combination of both Facebook powered chat and simple livechat. For the users who are logged-into their FB Messenger account, the widget acts as a Facebook chat, and for all the non Facebook users it behaves as a simple live chat.
Facebook Messenger Bot
Facebook messenger bot helps you to interact with your audience on Facebook through your Facebook page. You can simply add your Facebook page on the platform and get started. You can deploy your bot on Facebook in the Channel tab , by clicking on 'Create New' button and choosing the Fb Messenger bot option.
The following window opens. If your Facebook page is already added on the platform, you can simple select the channel account as indicated in the block (1) of the below image. You can modify the persistent menu options as shown in block (3) by adding more menu options. The persistent menu is represented by three parallel lines and is present at the bottom of the bot.
You can also modify the greeting text on the bot as indicated in block 4 of the below image.
In case your page is not already added, you can click on 'Create' Button as indicated by the arrow, to add your Facebook page on the platform.
The following window opens.
The following window opens.
For enterprises, the brand's official Facebook page needs to be added through 'Facebook Business Manager'. You can add a the URL for the brand's Facebook page and the platform would request some permissions on the page to be added. For further details on this please check out the document Morph.ai - Business Manager Request
For all other cases, you can choose 'Manual' option to add/create you Facebook page.You can now choose your user account to add your Facebook page. In case, your user account is not created, you can click on 'Add new user' , that would ask you to provide your Facebook credentials and grant Morph.ai access permissions to your Facebook pages.
You also have an option to create a new page, by clicking on the 'Add new page' button. This helps you create a dummy page, where you can test out the bot before going live on your official page.
You also have an option to create a new page, by clicking on the 'Add new page' button. This helps you create a dummy page, where you can test out the bot before going live on your official page.
Website Chat
Another channel to interact with your audience is your website. The website bot can be a simple website chat (users can interact directly with the bot), a Facebook powered chat (users would need to login their Facebook messenger to interact) or a Hybrid chat as already discussed above.
You can design and deploy your website widget in the Channel tab , by clicking on 'Create New' button and choosing the Website Chat option.

You can use any messenger type - Livechat, Facebook Messenger Web Plugin or Hybrid Chat. Each chat widget can be customised according to your need by using multiple functionalities available on the platform. The user can define the theme colour, logo, greeting text and header texts.
For each channel type you need to create a channel account, that can be created by clicking on the Create button as shown in the below image.

You can design and deploy your website widget in the Channel tab , by clicking on 'Create New' button and choosing the Website Chat option.
You can use any messenger type - Livechat, Facebook Messenger Web Plugin or Hybrid Chat. Each chat widget can be customised according to your need by using multiple functionalities available on the platform. The user can define the theme colour, logo, greeting text and header texts.
For each channel type you need to create a channel account, that can be created by clicking on the Create button as shown in the below image.
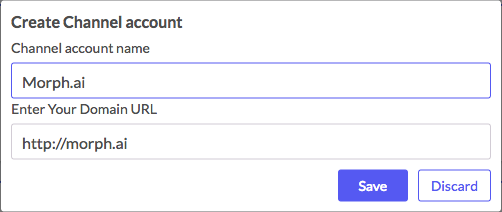
You can create an account by providing a name to the account and adding the website as shown in the below image.

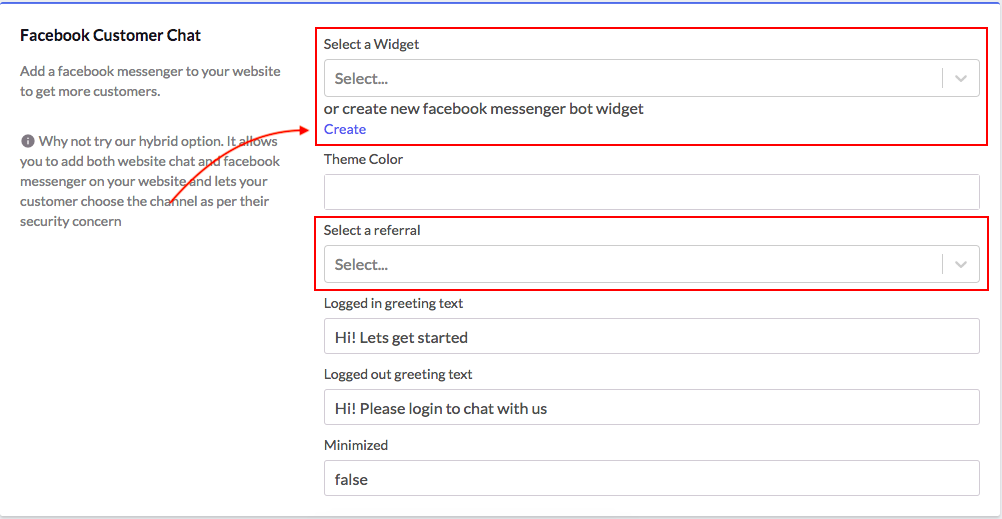
For Facebook Messenger Web Plugin and Hybrid Chat, you will need to add the Facebook page on the bot in the Select a Widget block as shown below image. This process is similar to the one discussed for FB Messenger bot. You also need to add the referral link for the bot that will be used to direct the users on the bot. This referral link can be created in Source tab and will be covered in Chapter 4.03 How to bring users to the bot.

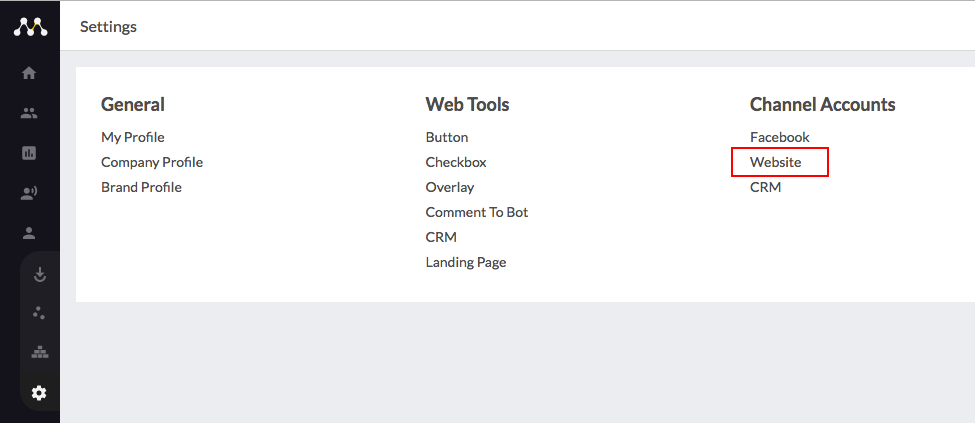
One you have created your chat widget, go to the Settings tab and click on 'Website' button under 'Channel Accounts'

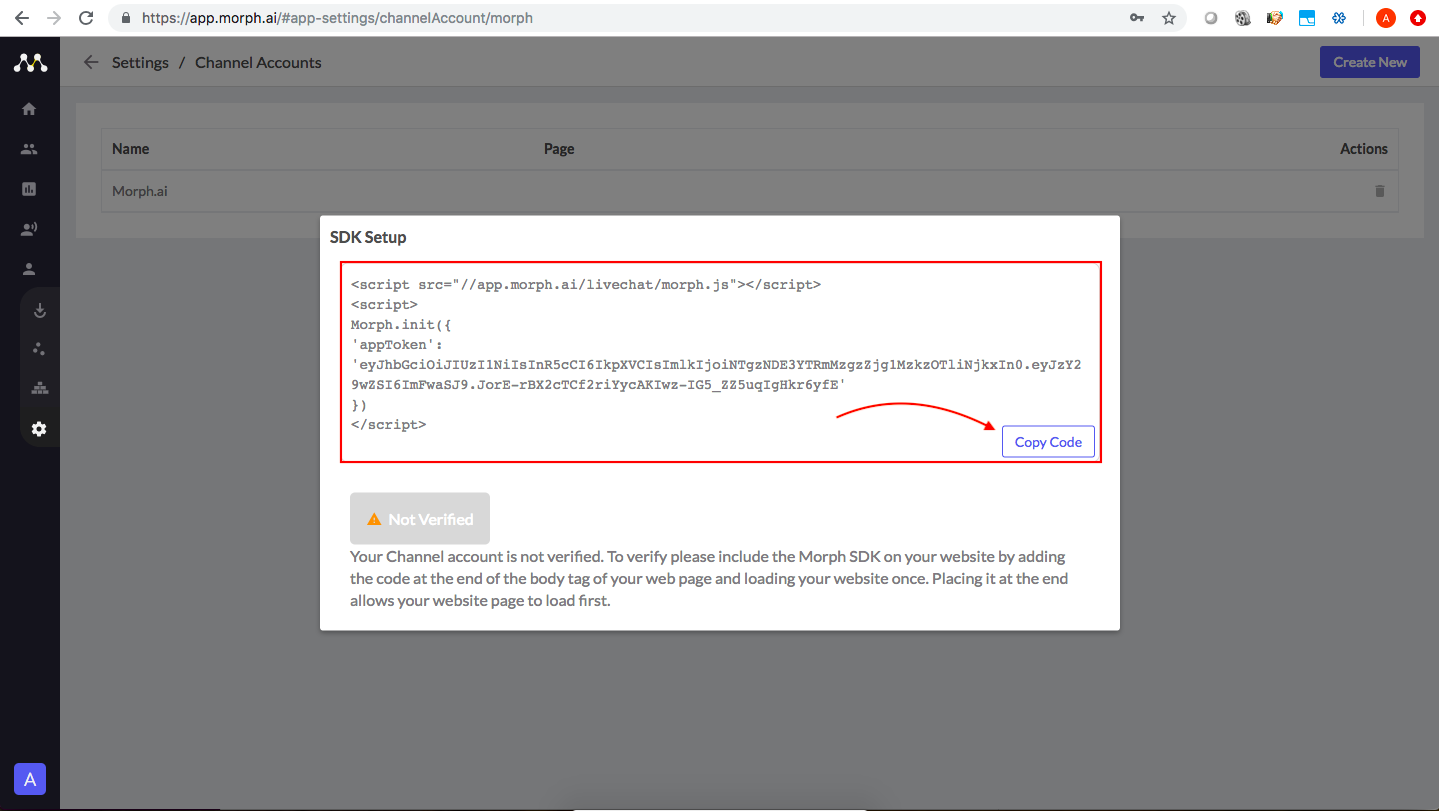
Click on the channel account where you want to deploy the bot to find a script that needs to be integrated on the landing page on the your website, where you wish to place your bot as shown in below image. Click on the 'Copy Code' button to copy the script.

Hope this helps you deploy your bot on various channels!
For Facebook Messenger Web Plugin and Hybrid Chat, you will need to add the Facebook page on the bot in the Select a Widget block as shown below image. This process is similar to the one discussed for FB Messenger bot. You also need to add the referral link for the bot that will be used to direct the users on the bot. This referral link can be created in Source tab and will be covered in Chapter 4.03 How to bring users to the bot.
One you have created your chat widget, go to the Settings tab and click on 'Website' button under 'Channel Accounts'
Click on the channel account where you want to deploy the bot to find a script that needs to be integrated on the landing page on the your website, where you wish to place your bot as shown in below image. Click on the 'Copy Code' button to copy the script.
Hope this helps you deploy your bot on various channels!
Related Articles
4.04 How to test your bot
Testing your bot is one of the most important step before going live. It is important to maintain a good user experience on the bot and therefore the bot needs to be tested for all the break points and end points. Before going live with the bot, you ...4.01 How to test your bot and Go live - Introduction
Once all the conversation flows have been created and workflows have been defined, you are ready to deploy your bot and test out the flows just to be sure that all the conversations are working fine and the user details collected have been saved ...4.03 How to bring users to the bot
There can be multiple ways to bring the user to the bot- Facebook ads, Email/SMS campaigns or Google ads. Based on the source, the platform provides you two ways for attracting new customers and communicating with your existing audience on the bot. ...Morph.ai - Introduction
Morph.ai is a chat based intelligent marketing automation tool that helps businesses leverage chat as a marketing channel. It is an integrated set of modules and analytics that help you manage the entire customer journey. Creating a bot on the Morph ...5.01 How to monitor your bot regularly - Introduction
This chapter will give you a brief of the ways by which you can monitor the activities on the bot. Now that your bot is live and running, you can keep a check on the conversations happening on the bot. Audience Tab Acts as a mini CRM which lists all ...